Battery switch on travel trailer function is crucial for managing your RV’s power. Understanding how this simple switch works can prevent electrical issues, save your batteries, and even keep you safe in emergencies. This guide will walk you through the different types of switches, their proper use, maintenance, and troubleshooting common problems, ensuring you’re ready for any situation on the road.
We’ll cover everything from identifying the switch in your travel trailer to safely connecting and disconnecting your batteries, explaining the interaction between the switch and other electrical components like inverters and converters. By the end, you’ll be confident in managing your travel trailer’s power system.
Battery Switch Types in Travel Trailers
Choosing the right battery switch for your travel trailer is crucial for managing your power system effectively and safely. Different types of switches offer varying levels of control and protection, so understanding their differences is key to making an informed decision. This section details the common types of battery switches and their characteristics.
Single-Pole Battery Switches
A single-pole battery switch is the simplest type. It’s essentially an on/off switch for a single battery. It allows you to disconnect the battery from the trailer’s electrical system completely, preventing accidental drain and offering a safety measure. Internally, it’s a basic switch mechanism that interrupts the current flow in a single circuit. Think of it like a light switch in your house, but for your battery.
A diagram would show a single line representing the battery, connected to a simple switch, then connected to the trailer’s wiring.
Double-Pole Battery Switches
A double-pole switch controls two circuits simultaneously, often used to isolate both positive and negative battery terminals. This provides more complete disconnection than a single-pole switch, enhancing safety by preventing current flow in both positive and negative leads. Internally, it’s similar to two single-pole switches working together, one for each pole (positive and negative). A diagram would show two lines representing the positive and negative battery terminals, each connected to its own switch, then connected to the trailer’s wiring.
Both switches must be off to completely disconnect the battery.
Double-Pole Double-Throw (DPDT) Battery Switches
A DPDT switch offers the most control. It allows you to switch between two different power sources, such as your house battery and a generator, or even connect to shore power. This is useful for managing multiple power sources and ensuring a seamless transition between them. Internally, it has a more complex mechanism that allows for the switching of two circuits to either of two different sources.
A diagram would show two lines (positive and negative) from the house battery, connected to one set of terminals on the switch, and two more lines (positive and negative) from the generator connected to another set of terminals. The switch can direct the power from either source to the trailer’s wiring.
Comparison of Battery Switch Types
| Feature | Single-Pole | Double-Pole | Double-Pole Double-Throw (DPDT) |
|---|---|---|---|
| Number of Circuits Controlled | One | Two (positive and negative) | Two circuits, switchable between two sources |
| Safety Level | Moderate | High | High |
| Complexity | Low | Medium | High |
| Cost | Low | Medium | High |
| Versatility | Low | Medium | High |
Battery Switch Location and Accessibility
Finding your travel trailer’s battery switch is crucial for both routine maintenance and emergency situations. Easy access prevents unnecessary fumbling and ensures you can quickly disconnect the battery if needed. Knowing where it’s located and how to access it safely will save you time and potential frustration down the road.The location of your battery switch varies greatly depending on the manufacturer and model of your travel trailer.
Some common locations include inside a dedicated compartment near the battery itself (often under a hinged access panel), inside a storage compartment close to the tongue, or even within a lockable exterior access panel on the side of the trailer. Less common, but possible, locations might include within a dedicated electrical panel inside the trailer.
Typical Battery Switch Locations and Access
The optimal placement of a battery switch prioritizes easy access while minimizing exposure to the elements. Ideally, the switch should be located in a readily accessible spot, close to the battery but protected from rain, snow, and excessive dirt. A well-designed system might include a weatherproof enclosure, or the switch could be situated inside a storage compartment that is itself weather-protected.
The switch should be clearly marked and easily identifiable.
Importance of Easy Access to the Battery Switch
Easy access to the battery switch is paramount for several reasons. First, regular battery maintenance, such as checking the water levels in flooded lead-acid batteries or inspecting the terminals for corrosion, requires convenient access. Secondly, disconnecting the battery is essential in emergency situations, such as preventing electrical fires or accidental short circuits during repairs. Finally, disconnecting the battery can prevent battery drain when the trailer is stored for extended periods.
So, you’re planning a trip? Awesome! Don’t forget travel insurance! Check out Aon travel insurance for comprehensive coverage. They’ve got options for everything from lost luggage to medical emergencies. And if you’re feeling adventurous and need a bit more specialized coverage, consider looking at Aon travel insurance – they often have packages tailored to outdoor activities.
Getting insured is just smart planning; peace of mind is priceless!
Safely Locating and Accessing the Battery Switch
Before attempting to locate the switch, always consult your travel trailer’s owner’s manual. The manual will provide specific instructions and diagrams for your particular model. If you can’t locate the switch using the manual, a visual inspection of common areas like those mentioned previously is a good starting point. Remember to always disconnect the negative (-) terminal first when working on the battery or battery switch to avoid accidental short circuits.
Ideal Battery Switch Placement Diagram
Imagine a diagram showing a travel trailer’s exterior. A small, weatherproof compartment is depicted near the tongue, slightly offset to the side to avoid direct mud splatter. Inside this compartment, a clearly labeled battery switch is mounted, with ample space around it for easy access. The compartment door is secured with a simple latch, providing protection from the elements while remaining easily accessible.
The battery itself is situated close by, also within a weather-resistant enclosure. The entire setup is clearly labeled “Battery Disconnect Switch” for easy identification. Wiring to the switch is neatly routed and secured, minimizing the risk of damage or accidental disconnection. This setup balances accessibility with protection from harsh weather conditions.
Connecting and Disconnecting Batteries Using the Switch: Battery Switch On Travel Trailer Function
Your travel trailer’s battery switch is a crucial safety and convenience feature. It allows you to easily disconnect your batteries from the trailer’s electrical system, preventing accidental drain and protecting sensitive electronics. Understanding how to use it correctly is essential for both routine maintenance and emergency situations.Properly connecting and disconnecting your batteries using the switch is straightforward, but safety should always be your top priority.
Working with batteries involves the risk of sparks, explosions, and chemical burns, so a cautious approach is paramount. This section will guide you through the process, emphasizing safe practices.
Safe Battery Connection Procedure
Before connecting your batteries, ensure the switch is in the “OFF” position. This prevents any accidental short circuits. Then, carefully turn the switch to the “ON” position. You should hear a distinct click indicating the connection is made. Observe your trailer’s lights and appliances to verify that power is restored.
If you notice anything unusual, immediately turn the switch back to “OFF” and investigate the issue.
Safe Battery Disconnection Procedure
Disconnecting your batteries is just as important as connecting them. To safely disconnect your batteries, start by turning off all appliances and electronics in your trailer. This will minimize any electrical surges or residual power that could cause issues. Next, firmly turn the battery switch to the “OFF” position. Again, you should hear a definitive click.
So, you’re planning a trip? Awesome! Don’t forget travel insurance! Seriously, it’s a lifesaver. Check out Aon travel insurance for comprehensive coverage; they’ve got options for everything from lost luggage to medical emergencies. And if you’re feeling adventurous and need a bit more specific coverage for your outdoor activities, consider looking at Aon travel insurance – they often have specialized plans for that.
Get a quote today and travel worry-free!
After switching it off, wait a few seconds before handling any electrical components to allow any residual current to dissipate.
Emergency Battery Disconnection, Battery switch on travel trailer function
In an emergency situation, such as a fire or a suspected electrical fault, quick disconnection of your batteries is critical. Locate your battery switch – it’s typically easily accessible near your batteries, though its location varies depending on your trailer model. Without hesitation, firmly turn the switch to the “OFF” position. This immediate action will cut power to your trailer’s electrical system, potentially limiting the damage and improving safety.
Safety Precautions When Working Near Batteries
Working with batteries requires careful attention to safety. Here’s a list of crucial precautions:
Always wear safety glasses to protect your eyes from potential splashes of battery acid or sparks. Gloves are also highly recommended to prevent skin contact with corrosive battery acid. Proper ventilation is essential, as batteries release hydrogen gas, which is flammable and explosive. Work in a well-ventilated area, or if indoors, use a fan to ensure good airflow.
Never use open flames or sparks near batteries. Avoid touching the battery terminals directly, and if you must, use insulated tools to prevent short circuits. If you spill battery acid, immediately neutralize it with baking soda and water, and thoroughly clean the area. If you’re unsure about any aspect of working with your batteries, consult a qualified RV technician.
Battery Switch and Electrical System Integration
The battery switch is the central control point for your travel trailer’s 12-volt DC system. Understanding its role within the larger electrical network is crucial for safe and efficient operation. It doesn’t just turn the batteries on and off; it governs the flow of power to various components, protecting them from potential damage and ensuring your appliances function correctly.Your battery switch acts as a gatekeeper for the DC power originating from your trailer’s batteries.
This power feeds several key systems. The converter, for instance, transforms 12V DC into 120V AC to power your household-style appliances. The inverter performs the opposite conversion, taking 12V DC and converting it to 120V AC, often for higher-power needs. Other components directly powered by the 12V DC system include interior lights, water pumps, and refrigeration systems (depending on the type).
The battery switch allows you to isolate these systems from the batteries when not in use, preventing unwanted battery drain.
Battery Switch Interaction with Other Electrical Components
The battery switch sits at the heart of the DC power distribution. When the switch is in the “on” position, it allows current to flow from the batteries to the various DC-powered appliances and to the converter and inverter. The converter then draws 12V DC to produce 120V AC for your household appliances. The inverter similarly uses the 12V DC supply to create 120V AC power for specific needs.
When the switch is “off,” it interrupts this flow, completely isolating the batteries from the rest of the electrical system. This prevents parasitic drain—a slow, constant discharge of your batteries even when the trailer isn’t in use.
Consequences of Incorrect Battery Switch Usage
Improper use of the battery switch can lead to several problems. Leaving the switch “on” while the trailer is stored for extended periods will deplete your batteries, leaving you stranded. Conversely, accidentally switching the batteries off while using appliances could cause malfunctions or damage sensitive electronics. For example, suddenly cutting power to a running inverter can damage the inverter itself.
Always ensure the switch is in the correct position before using or storing your travel trailer.
Diagram of Electrical System Integration
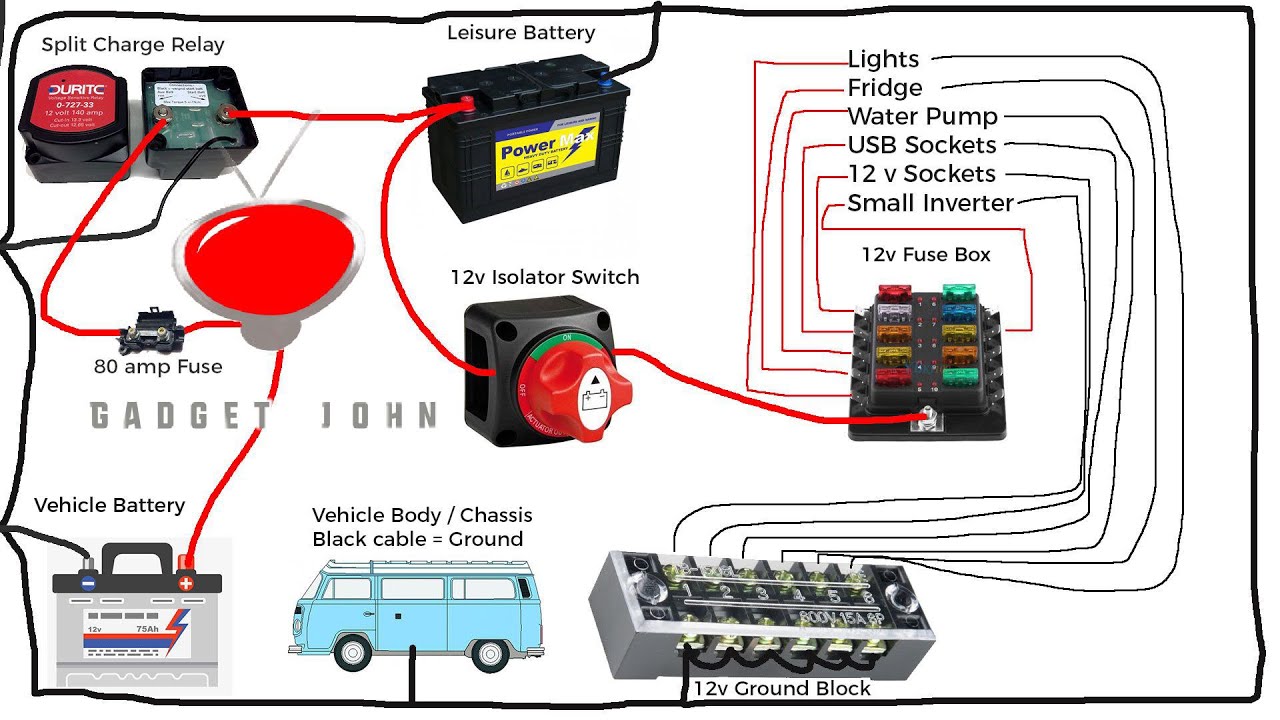
Imagine a simple diagram. At the top, you have two battery terminals (+ and -). A thick line represents the battery switch, with the switch depicted as a simple on/off toggle. From the switch’s output (“on” position), multiple lines branch out. One line goes to the converter, which is depicted as a box labeled “Converter (12V DC to 120V AC).” Another line leads to the inverter, labeled “Inverter (12V DC to 120V AC).” Finally, a group of smaller lines represents various DC-powered appliances and systems like lights, a water pump, and a refrigerator, collectively labeled “12V DC Appliances.” When the switch is “off,” the lines from the battery are effectively cut, preventing power from flowing to any of these components.
This visual representation clearly shows the battery switch’s role as the central control point for the entire 12V DC system.
Mastering your travel trailer’s battery switch is key to a smooth and safe RV experience. From understanding the various switch types to performing basic maintenance, this knowledge empowers you to troubleshoot problems, prevent costly repairs, and enjoy worry-free adventures. Remember to always prioritize safety when working with electricity and batteries. Happy travels!
FAQs
What happens if I leave my battery switch on all the time?
Leaving your battery switch on constantly can drain your batteries, especially if you have parasitic draws from appliances or electronics. It’s best to turn it off when not using your trailer for extended periods.
How often should I check my battery switch for corrosion?
Inspect your battery switch for corrosion at least once a year, or more often if you live in a humid climate or frequently travel in wet conditions. Clean any corrosion immediately.
My battery switch is stuck. What should I do?
Try lubricating the switch with a penetrating lubricant like WD-40. If that doesn’t work, you may need to replace the switch. Consult a qualified RV technician if you’re unsure.
Can I use a different type of battery switch in my travel trailer?
Replacing your battery switch with a different type might require rewiring and should only be done by someone with electrical experience. It’s crucial to match the amperage rating and other specifications of your existing system.
